When you pay more for a product, you expect a better level of everything - performance, features, support. In a motherboard, I'd want all the upgrades - top line audio, overclockability, superior software, better USB 3.0 / SATA 6 Gbps controllers, and so on. The ASRock X79 Extreme9's party piece is the bundled 'Game Blaster' - a PCIe x1 card with Creative Sound Core3D Audio powered by a quad core audio processor and an additional Broadcom Gigabit LAN port. All in at $360 MSRP, today we review the Extreme9 to see if it fits into the enthusiast of enthusiast price segments.
Overview
It's hard to place the X79 Extreme9. I have reviewed the Extreme4 and Extreme4-M, both of which were good X79 budget boards for consumers or enthusiasts who wanted to jump into Sandy Bridge-E as cheaply as possible. The X79 Extreme9 comes in around +50% more than those boards ($360 vs. ~$240), meaning I would expect 50% more when it came to the Extreme9. And to a certain extent, we have obvious improvements:
| ASRock X79 Series | ||
| X79 Extreme4 | X79 Extreme9 | |
| Price | $235 | $360 |
| Size | ATX | ATX |
| Power Phase | 6+2 | 16+2 |
| Memory | 4 x DDR3 | 8 x DDR3 |
| PCIe | x16/x16/x8 | x8/x8/x8/x8/x8 x16/-/x16/-/x8 |
| CrossfireX | 2x, 3x, 4x (Dual GPUs only) | 2x, 3x, 4x (Dual GPUs only) |
| SLI | 2x, 3x, 4x (Dual GPUs only) | 2x, 3x, 4x (Dual GPUs only) |
| Audio | ALC 898 | Creative Sound Core3D |
| LAN | Single | Dual |
| SATA 6 Gbps | 5 | 8 |
| USB 3.0 | 4 | 8 |
| USB 2.0 | 12 | 12 |
| XFast Software | Yes | Yes |
| Digital PWM | Yes | Yes |
| Dr. Debug | Yes | Yes |
Power delivery has increased from a 6+2 to a 16+2 phase, we have the full complement of 8 DIMMs for X79 (two per channel), 5 PCIe (but still limited to 3-way SLI/CFX unless dual GPU cards are used), a dedicated audio processor, dual gigabit connections (which can be teamed) rather than a single, more SATA ports (8+4 rather than 5+4), and more USB (8+12 rather than 4+12). So in terms of functionality, we've got a lot of upgrades here for our extra 50%.
However after testing, I wasn't all that impressed. Performance is not at all noticeably different, and automatic overclocking wasn't at all 'better' for 24/7 use. On the positive, the manual overclocking was highly successful, and I was able to breeze through my regular suite of tests without a major hitch - no initial turbo or memory issues - which usually happens when testing a motherboard. Only when it came to overclocking and DDR3-2400 support did I feel let down in any way. But the competition comes from the cheaper boards, either ASRock or other - it all boils down to functionality.
The last board I reviewed, the ECS X79R-AX, while it didn't have 8 DIMM slots, dual gigabit Ethernet or improved audio, came with the same 12 SATA ports, built in wireless and Bluetooth, and was up to $80 cheaper. The first X79 I tested, the ASUS P9X79 Pro, performed well, offers a range of extra features, has a first-rate BIOS and is $30 cheaper. The ASRock X79 Extreme9 has some serious competition when compared to these boards.
Visual Inspection
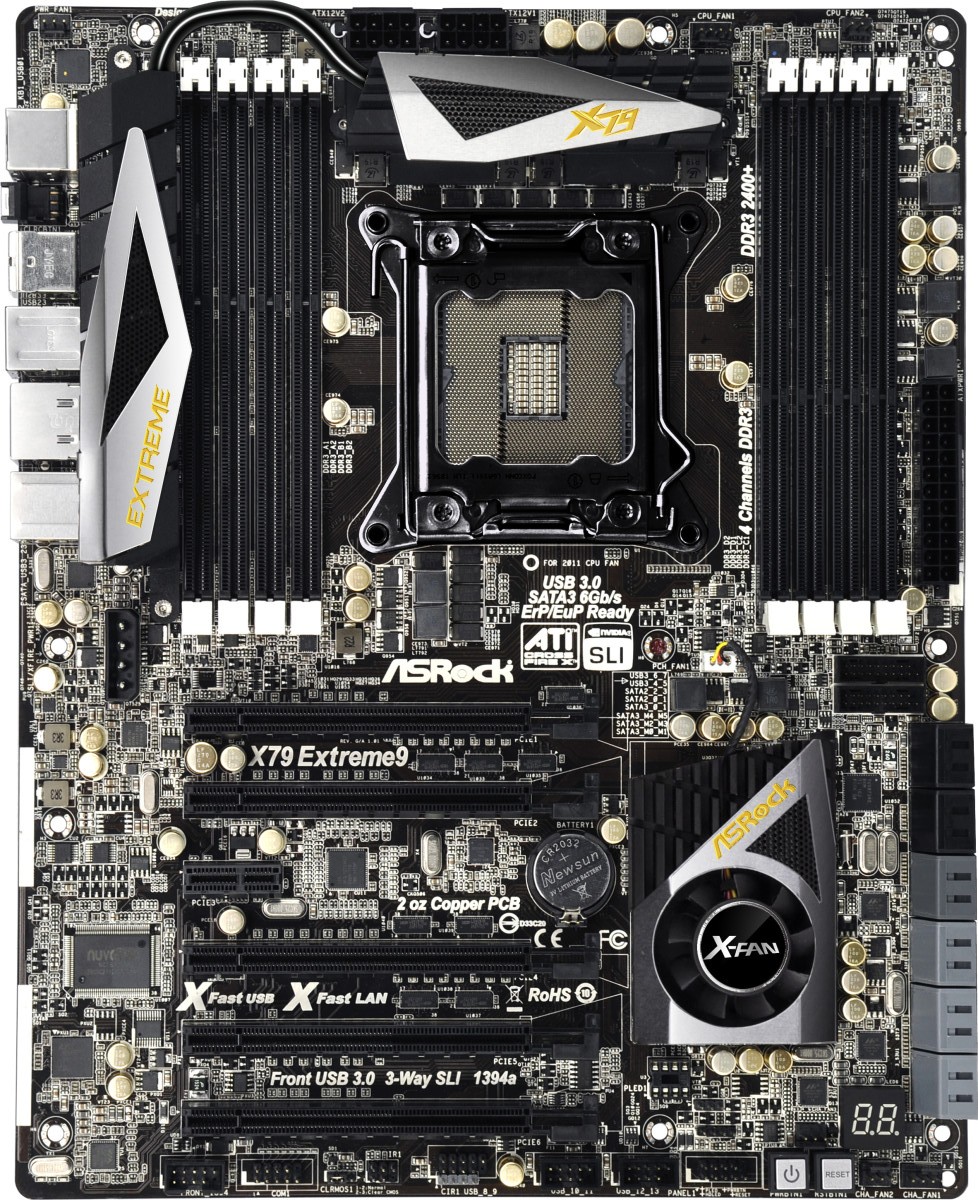
I really like the ASRock coloring scheme of black, silver and gold - not only is it pleasant to look at, but the detail of also making the capacitors gold means that with some good lighting, it would look nice in the window of a case. It's a shame then the board seems to fill every nook and cranny with resistors and chips.
Into the meat of the design, and the first thing to notice is the extended power delivery heatsink, connected from the top to the left hand side via a heatpipe. The heatsinks themselves are fairly beefy affairs, with a modest attempt to balance brute mass of heat transferable material with surface area for cooling. This, combined with the 8 DIMM slots and dual 12V 8-pin connectors leaves little room in the CPU socket if all 8 DIMM slots are filled - if you only have four memory sticks, the recommended filling doesn't include the ones nearest to the CPU, meaning a little extra memory for big air coolers.
There are three fan headers along the top - on the top right, a 3-pin power fan header, and to the right of the 8-pin 12 V power connectors are two CPU fan headers - one 4-pin and one 3-pin. The other fan headers on board are in the bottom right of the board, where we find three chassis headers (one 4-pin and two 3-pin). What we usually see on boards these days is another one by the 24-pin ATX power connector, but ASRock have filled the area around it with resistors and two USB 3.0 headers. The USB 3.0 headers are designed for front case USB 3.0 brackets, of which one is included with the X79 Extreme9.

The SATA ports are numerous down the right hand side - the first two in black are the SATA 3 Gbps from the PCH, followed by two SATA 6 Gbps from the PCH in dark grey. Below this are six SATA 6 Gbps ports powered by three controllers - two ports from one Marvell SE9220 controller, and four ports from two Marvell SE9172 controllers. It might seem odd to use two different controllers for these ports - one could assume that the 9172 is cheaper than the 9220, or there were implementation issues with three SE9220s, but the real reason is SSD caching. The SE9220 has a hardware based caching mechanism when an SSD+HDD are used. This is all enabled through software provided on disk. Next to the SATA ports, we find the power/reset button combo as well as a debug LED - useful for finding memory boot errors (among others)!
The PCH heatsink at the bottom is small, and unlike other non-ASRock X79 boards, comes with a small fan attached. The beauty of this system is that the fan will only rotate if the PCH goes above 50ºC. One of the criticisms is that fans like these make a lot of noise, especially when they are about to die - as this fan will spin infrequently (most likely only during gaming when heat is being heavily produced inside a case), this isn't really an issue here, at least in my perspective.
The ASRock board has 5 full-length PCIe slots, which default to either x16/-/x16/-/x8 or x8/x8/x8/x8/x8 depending on how they are filled. There is a solitary x1 port after the first two PCIe full length ports, designed for the ASRock Game Blaster card as shown in the stock image above. The Game Blaster lights up red when powered (which is obscured by any second GPU installed), and the audio outputs also light up when powered for their different functions, making it easier to see if you have to fiddle in the dark behind a case.

As we don't have direct onboard audio with the X79 Extreme9, this would perhaps give ASRock an opportunity to surprise us on the back panel. Nothing really special here though - a PS/2 Keyboard only port, six USB 2.0 ports, four USB 3.0 ports (blue), two eSATA 6 Gbps ports (red), a Clear CMOS button, a gigabit Ethernet port, and a Firewire/IEEE 1394 port. We're not seeing many X79 boards with Firewire/IEEE 1394 of late, perhaps due to the prevalence of USB.
BIOS
The art of a good graphical BIOS over the past twelve months is to balance what is graphically possible with ease of use and availability of information. So far, we've not achieved perfection by any manufacturer, though there are a couple who have come close on all three accounts. In that regard, ASRock (and other manufacturers) have a tough battle ahead of them, as a good BIOS can mean the difference between an error-free system and one very frustrated reviewer.
From the outset, ASRock have done a really good job, especially in terms of ease of use. Almost everything you ever need is easy to find and in the right place. For their graphical prowess, this mainly comes in the System Browser, which is an overlay of the board with mouse-over points to see what hardware the system actually detects is installed. This isn't the best use of BIOS capability, but at least it doesn't confuse the user.

The first screen when we enter the BIOS is this main screen, showing the board, the UEFI version, the processor type and speed, the memory, and what memory is in what slot. This is, at the bare minimum, the useful information every manufacturer should have when a user enters a BIOS. Icing on the cake would be some voltages and fan speeds as well.

The system browser is a simple mouse-over interface, telling the user what is installed where. Mouse over any of the essentials (memory, PCIe, CPU, SATA ports, I/O Panel), and the information is displayed at the bottom. So if you have a dud memory stick (or are wondering why only 12 GB is being seen in the OS rather than 16 GB), then this screen will help.

The OC Tweaker screen is where the overclocks are done - ASRock have provided their standard bunch of 'CPU EZ OC' settings, from 4.0 GHz to 5.2 GHz in 200 MHz increments. Those beyond 4.6 GHz are in red, to notify the user of 'extreme overclocks' that may require sufficient cooling. I will discuss the success (or lack of) these auto options in the overclocking section below.
For manual overclocks, we have almost the full range of options - multiplier, power limits, BCLK, memory, sub-timings, and voltages. One thing is missing - the ability to change the CPU strap from 1.00x to 1.25x and beyond. ASRock say this is done automatically by adjusting the BCLK to near the strap you want. This has issues, as if the BCLK is raised it will soon hit the wall of the 1.00x strap, and have a large 'unbootable range' until it reaches near the 1.25x strap. I would prefer the opportunity to adjust the strap, personally.

The storage configuration is a good screen, showing the user all of the 14 different SATA ports and what is connected to each. I could imagine that in case, having all 12 onboard SATA ports connected will need appropriate cabling, so if one drive doesn't respond, you can find out if the BIOS actually detects it here.

The fan controls are in the HW Monitor section of the BIOS, where we see the temperatures of the probes on board as well as fan speeds and main voltage lines. The CPU fan settings, by default, are set to Full On. This means that any CPU fan will go at 100% unless the user changes it - we saw this on the Extreme4 and Extreme4-M as well. Only the first Chassis fan is able to be temperature activated, as it is the 4-pin connector. The others can be set between Level 1 and Level 4, which doesn't describe how the fan reacts to the motherboard stimuli - I assume the higher the level, the colder the fan is ramped up to full speed.

Tidak ada komentar:
Posting Komentar