Over the past 12 months I have covered a number of ECS boards, from the Sandy Bridge and Fusion range, including one with a Hydra chip. Looking back on those, there was a distinct running theme – a willingness to offer the consumer perhaps something different. My tour of the ECS headquarters back in June, and a Q&A session with an ECS VP, gave credence to ECS pushing more into the consumer market rather than their roots in OEM. X79 was a focal point for this, and today we are seeing the fruits of that perseverance, in the X79R-AX (Black Extreme) motherboard.
Overview
Overall, I have to say that this board performed well, after some initial teething problems. What we have is a $310 X79 motherboard ($260 with mail-in rebate from ECS until 2/3) with dual Gigabit Ethernet, support for 12 SATA devices (and 12 SATA cables included), a USB 3.0 bracket, support for quad-SLI/CrossfireX as well as onboard WiFi and Bluetooth. With the MIR this makes it a very attractive board, within firing line of the Gigabyte X79-UD3 reviewed previously.
However, some users will note some areas which are perhaps comparably not as desirable compared to others – a Realtek ALC892 audio rather than the ALC898 commonly on X79, both gigabit Ethernet ports are also Realtek rather than Intel (or Broadcom), and only four DDR3 DIMM slots. Personally, while these features are nice to be upgraded, from a personal perspective, they probably are not deal-breakers unless you specifically need the upgraded component.
In terms of auto-overclocking, this is one of the best ones we've seen, giving a 4.5 GHz CPU overclock, and applying an XMP profile, with just one option in the BIOS. However, other overclocking methods are not as easy - I had difficulty using the auto-memory overclocks, and the CPU multiplier adjustment didn't seem to work, leaving only the CPU strap and BCLK to adjust. Visually, I like the ECS style, with the black, grey and white, and everything is laid out on the board relatively easy to get to. The board itself comes with a 3-year warranty for parts, 2-year for labor.
There were some initial hindrances in the X79R-AX review sample I received. I was confused about some of the SATA ports labeled SAS, given that SAS compatibility was pulled from the Sandy Bridge-E specifications, but this was remedied by installing Intel RST in the OS. On my shipping BIOS (11/10/2011), there were also issues relating to Turbo not being applied to the CPU. This was fixed in the latest BIOS I was shipped (12/26/2011), which should be online shortly. I have also fired a list off to ECS for some suggested changes to default settings to help consumers, but nevertheless, with the features on board, for the price (and the rebate), ECS have a very attractive offering.
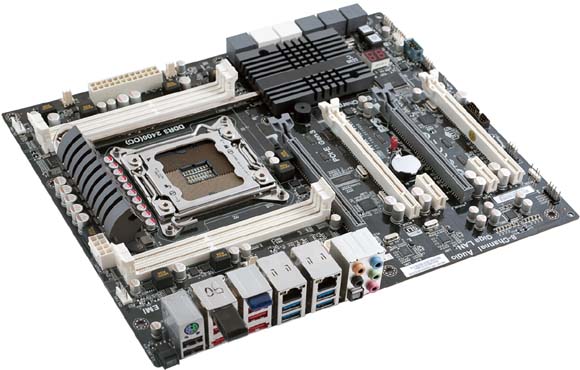
Visual Inspection
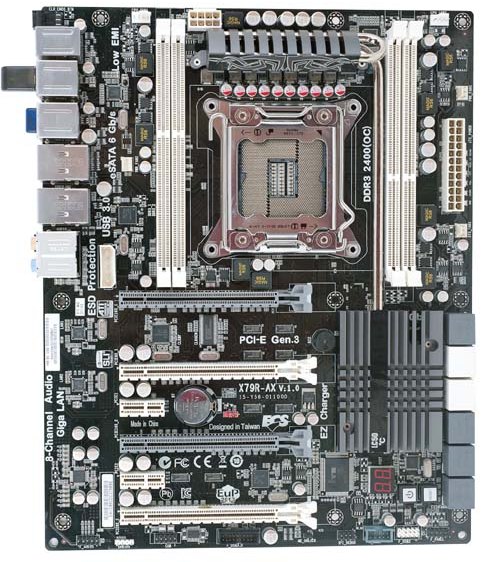
As mentioned previously, I like the ECS color scheme of black, white and grey. Anything that cannot be changed and is in the background is black, and everything else is grey/white. For your money, the first thing users will see is that there are only four DDR3 DIMM slots, compared to some models in this price range having eight. The pros and cons of having eight slots over four are debated wildly across the internet, and it comes down to need – if you want more than 16 GB (4x4 GB) of memory in your system (assuming you are not willing to spend $$$ on 8 GB modules). For most enthusiasts (gaming, overclocking), the answer is probably no, whereas for media editing, rendering, VMs or simulation, you may need more.
Around the socket itself we have a tight squeeze with the DIMMs and the VRM cooler. The VRM cooler is connected via heatpipes to the chipset cooler, and also sports ECS' new 'Qooltech IV' technology. This is essentially a strip (or as ECS put it, 'thermal chromic technology') with chemicals that change color (black/transparent to orange) above a certain limit, akin to what you may have had put on your head as a child to check your temperature. The downside I found is that my CPU cooling obscured this, making it quite irrelevant to the product. Even with the extra temperature strip on the chipset heatsink, that was obscured mainly by my dual GPU setup.
In terms of fan headers, the board has five - two four-pin CPU headers at the top of the board (one either side of the VRM), a three-pin PWR fan to the left of the socket and two 3-pin (one SYS and one PWR) straddling the 24-pin ATX power connector. This means no fan connectors at the bottom, which is a shame. These fans are either controlled via the BIOS, or the eSF software provided by ECS will adjust the SYS fans via a hysteresis loop. More on that later.
Moving down the right hand side of the board are the abundant SATA ports. From top to bottom, we have two SATA 6 Gbps from the PCH in grey, four SATA 3 Gbps from the PCH in white, four SATA ports labeled 'SAS' from the PCH in grey, then another two SATA 6 Gbps in grey from an ASMedia controller labeled EXSATA. Officially, these last six are not supported by the chipset, but are still in the silicon. They have to be enabled in BIOS, then again in the OS by Intel RST - this can be frustrating slightly if you just plug in your hard-drive and expect to be able to install an OS straight away. I suggest using the top six connectors until everything is installed, or keeping the bottom six ports purely for storage devices.
The south side of the board is relatively empty compared to others, with only two USB 2.0 header, one USB 3.0 header, a COM header, front panel connectors and SPDIF output. One thing which does annoy me slightly on ECS boards is the lack of printing on the PCB where the connectors for the front panel should go - this is commonplace on almost every other manufacturer, so users do not need to pull out the manual. For a reviewer, the Power/Reset buttons are a help in this regard, but for users fiddling inside a case, this info should be there on the board itself. Also of note down the bottom of the board is the Debug LED for diagnosing issues.
In terms of PCIe layout, Simple Makes It (a) Lot Easier with the ECS board, sporting four PCIe full length slots each separated by a gap, and thus in x16/x8/x16/x8 configuration (the second x16 becomes x8 when the fourth slot is populated). In between these are a pair of PCIe x1 slots, meaning no PCI connectivity.
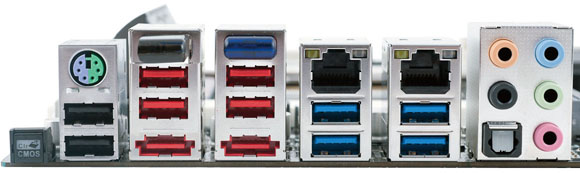
The IO panel is awash with USB ports, making up for the lack of headers on the board itself. From left to right, a clear CMOS button, PS/2 connector, two USB 2.0 ports, then the WiFi dongle (antenna is attached to this dongle and comes with the board), two more USB 2.0 ports, an eSATA 6 Gbps port, a blue Bluetooth dongle, two more USB 2.0 ports, and an eSATA 6 Gbps port. Onto the two Realtek Gigabit NICs, and the four blue USB 3.0 ports. Finally we have the audio jacks and SPDIF digital output.
BIOS
There are a lot of manufacturers who put a substantial amount of time and effort into their BIOS systems, and it shows in terms of compatibility, performance, and presentation. In the early days of P67 UEFI, ECS' implementation wasn't much more than a glorified old-fashioned BIOS, with a new set of colors and menus. Back in my ECS HQ Tour in June, I walked past engineers working on their 'more graphical' implementation, which is what we have to look at today. Admittedly, from a usage standpoint, not much has changed - it still feels like you're navigating an old fashioned BIOS system, but with an enhanced color scheme.
One small change that ECS have done is with an easy and advanced mode for their BIOS. At the minute, the BIOS defaults to the Advanced mode, which defeats the purpose of an easy mode, however that may change with BIOS updates. The Easy menu has four buttons - Language, Default, Boot and Advanced, which essentially do what they say on the tin. The Boot menu allows you to select a one-off boot device, which is odd when this option isn't in the advanced part of the BIOS menus (and one I rather like).

The BIOS is easy to navigate, but the initial screen doesn't provide any of the vital information a user might need - CPU, current CPU speed, Memory installed, Memory speed, basic voltage readings, fan speeds, temperatures. This is all basic stuff which could be listed on the front page for quick access. In terms of temperature/fan speed/voltages, these are found in the PC Health submenu, which further expands into the smart fan settings.


The smart fan settings and controls have preset modes, or manual adjustments. This is the only place you can set the CPU fan settings - the OS software only allows control of the SYS fan headers. Personally, I prefer the OS software anyway to the OS controls here - units such as 'PWM value' have no place on a user screen on a BIOS.

The main bread and butter of a BIOS is in the overclocking, found under the M.I.B. X heading in the ECS BIOS. The front screen contains some of the overclocking tools - the very good 'Quick OC' option which puts the board into preset values supplied by ECS (more on that later), a set of ECS OC profiles (not so good, as of the BIOS I am using), BCLK and CPU strap adjustments, and voltage modification. This screen doesn't have anything CPU multiplier or memory related, which is a big oversight, as they are just as important.
Voltages are only available in offset mode, which is frustrating when the CPU VCore lists the current value, rather than the stock value. In order to change the BCLK, the 'CPU Overclocking' option needs to be set to enabled. In order to adjust the CPU multiplier, users have to navigate to the 'CPU Overclocking Function' menu. Memory tweaking requires the 'Memory Overclocking Function' menu. Note, as of the 12/26/2011 BIOS, I was unable to adjust the CPU multiplier. Another issue is when a user changes the CPU strap from 1.00x to 1.25x - this directly affects the memory, but as there isn't a memory setting on this M.I.B. X front screen, users may suffer boot failures due to memory being clocked too high.
Other points to be noted in the BIOS:
- By default, the bottom six SATA ports are set to disabled, as they are technically not supported by the chipset. Users have to navigate to Advanced -> SCU SATA to enable the ones listed 'SAS'.
- On the 12/26/2011 BIOS (which I'm told may not be a full release BIOS), the WiFi and Bluetooth were also disabled by default. ECS tell me that for consumers, these will be enabled by default, and thus installed by the Chipset driver utility program. Just a heads up if they still are not working after you have installed the chipset drivers.
- Overclock recovery is almost non-existent on the X79R-AX. Whenever I had overclock issues, especially memory, the board would stop on a POST code for a minute or two, then shut down. On trying to clear CMOS, I was left with a blank Debug LED and the board still not even getting to BIOS. The only way to remedy this was to remove the power cord, then hit the Clear CMOS button on the IO panel. The board would then boot, albeit with all my settings lost.
USB Speed
For this benchmark, we run CrystalDiskMark to determine the ideal sequential read and write speeds for the USB port using our 64GB Patriot SuperSpeed USB 3.0 drive. Then we transfer a set size of files from the SSD to the USB drive, and monitor the time taken to transfer. The files transferred are a 1.52 GB set of 2867 files across 320 folders – 95% of these files are small typical website files, and the rest (90% of the size) are the videos used in the Sorenson Squeeze test.
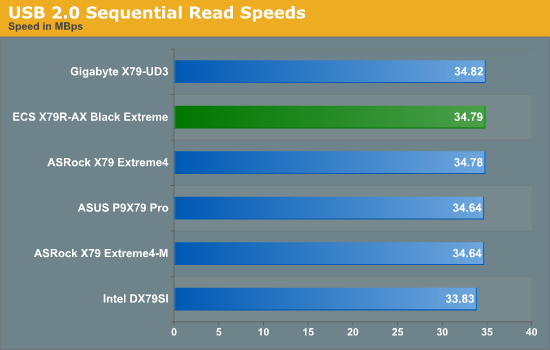
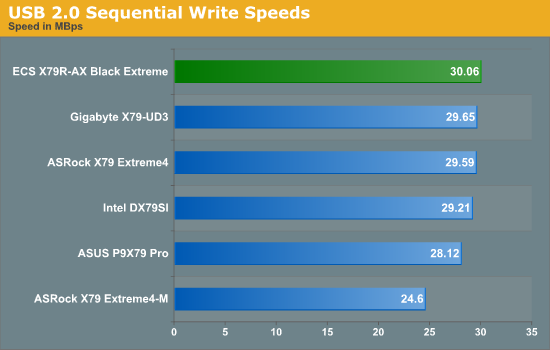
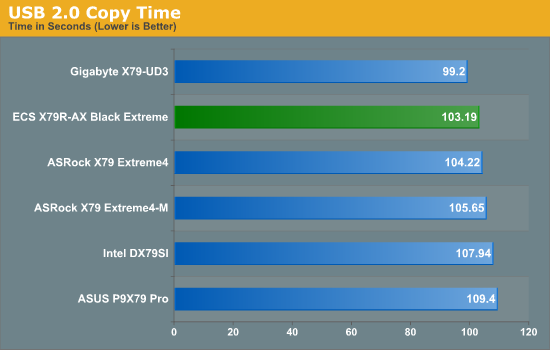
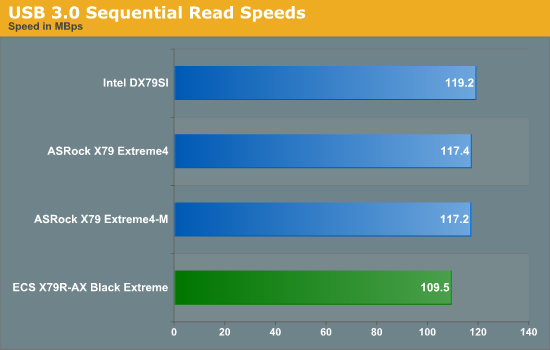
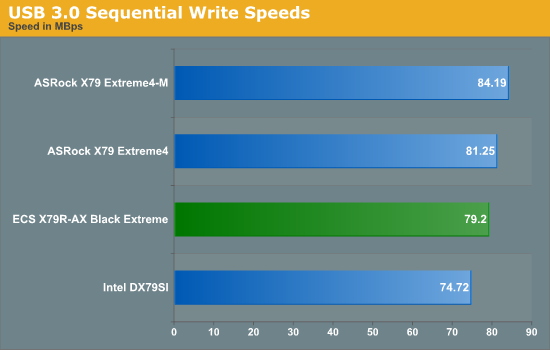
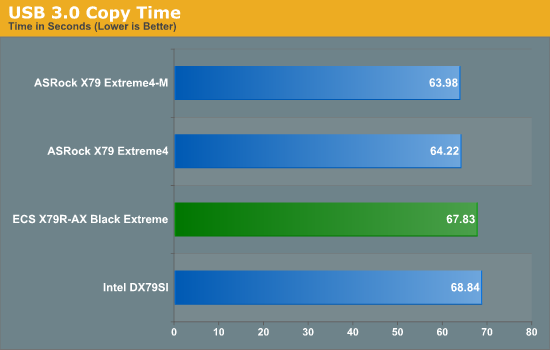
USB 2.0 performance on the X79R-AX seems comparatively on the high end, whereas USB 3.0 performance seems not as good as the ASRock boards.
SATA Testing
We also use CrystalDiskMark for SATA port testing. The operating system is installed on the SSD, and the sequential test is run at the 5 x 1000 MB level. This test probes the efficiency of the data delivery system between the chipset and the drive, or in the case of additional SATA ports provided by a third party controller, the efficiency between the controller, the chipset and the drive.
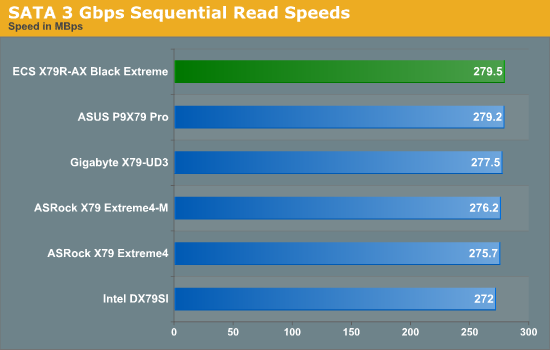
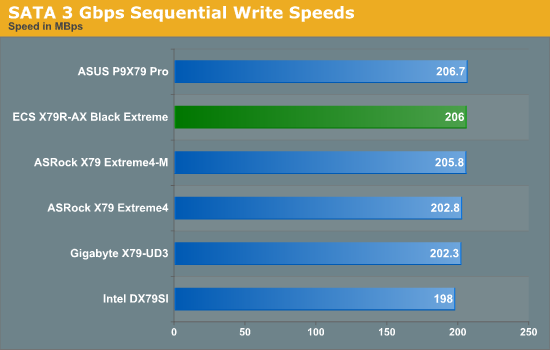
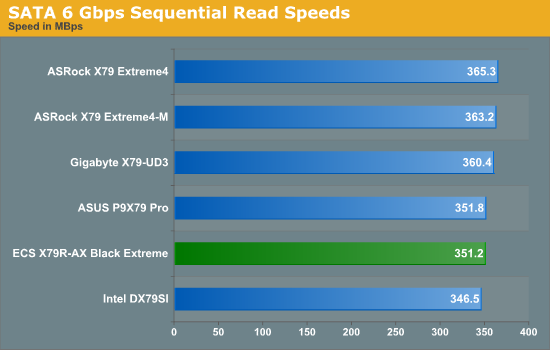

Similarly, the ECS board peforms better on the old standard than the new standard.
DPC Latency
Deferred Procedure Call latency is a way in which Windows handles interrupt servicing. In order to wait for a processor to acknowledge the request, the system will queue all interrupt requests by priority. Critical interrupts will be handled as soon as possible, whereas lesser priority requests, such as audio, will be further down the line. So if the audio device requires data, it will have to wait until the request is processed before the buffer is filled. If the device drivers of higher priority components in a system are poorly implemented, this can cause delays in request scheduling and process time, resulting in an empty audio buffer – this leads to characteristic audible pauses, pops and clicks. Having a bigger buffer and correctly implemented system drivers obviously helps in this regard. The DPC latency checker measures how much time is processing DPCs from driver invocation – the lower the value will result in better audio transfer at smaller buffer sizes. Results are measured in microseconds and taken as the peak latency while cycling through a series of short HD videos - under 500 microseconds usually gets the green light, but the lower the better.
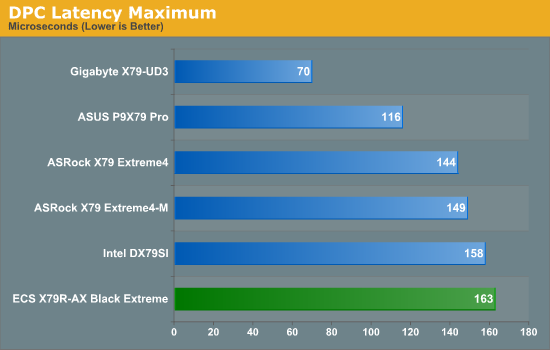
While under the 500 microseconds we want from the DPC test, the default ECS X79R-AX latency is high compared to other X79 boards.

Tidak ada komentar:
Posting Komentar